Running Rigging
Image Gallery
Project Logs
December 29, 2011
The traveler has been installed for a couple months now. It was a decision between using the old mainsheet blocks or adding a traveler. When I first bought my Bristol 27, it had a traveler and I also asked other Bristol 27 owners (via our Facebook group) as to what they would prefer. I would say the majority of other B27 owners actually liked the mainsheet, dual block system that originally came with the B27. A few did prefer the traveler and mentioned it’s ability to better go upwind. I was a torn about this decision, because it would be far simpler to use the existing mounts for mainsheet blocks than to install a traveler. I also wasn’t a big fan of how much room the traveler might take up in the cockpit. Further, I liked the price of buying two blocks compared to an entire traveler system. In the end, I decided to go with a traveler, here’s why:
- There are some benefits to upwind sailing when using a traveler as you have more specific control over the mainsheet’s location.
- The engine controls will be mounted below the traveler and the traveler should stop most lines from getting caught up in these controls.
- I plan to have a teak grate in the cockpit that will be able to be raised up to create a full mattress in the cockpit. By installing the traveler, I was able to build out two blocks which will support the mattress.
- I’ll be new to sailing when I eventually hit the water, so a traveler may give me more ability to fiddle and play with the sails as I learn the ropes.
- I have plans
- Determine Location – There are a number of places one can place a traveler including the cabin top, bridgedeck, aft portion of cockpit seats or lazarette area. I decided on the aft portion of the cockpit seats, in about the same location as the previous traveler had been. The other choices weren’t as enticing. For example, The cabin top wasn’t a good choice, because I didn’t have much room up there and it would also likely interfere with my dodger. Further, the traveler is best placed at the end of the boom for most amount of purchase. The bridge-deck was also never really a consideration, because they would interfere with movement in and out of the boat and also remove a nice seat. The lazarette area was a possibility, but it would require modifying the lazarette locker lid and that seemed like too much engineering.
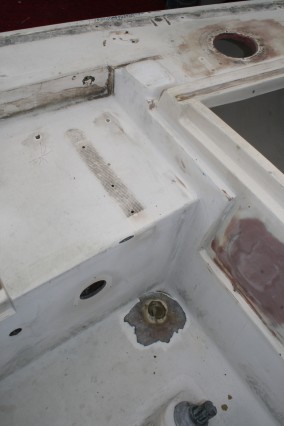
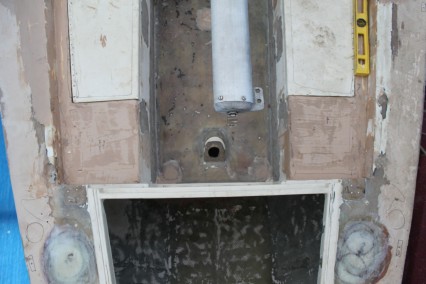
- Prepare the Area – Previously, I had repaired some core rot in this area and faired the cockpit seat. At that time, I hadn’t planned on adding a traveler, but since my decision changed, I needed to grind back the area where the traveler would be mounted so as to have a good surface to attach the traveler.
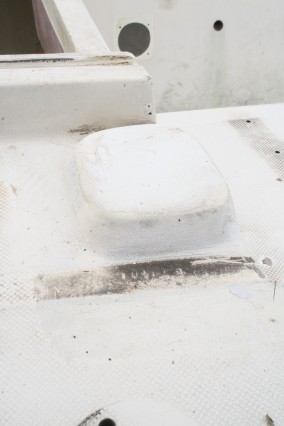
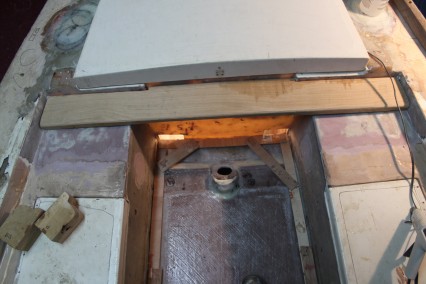
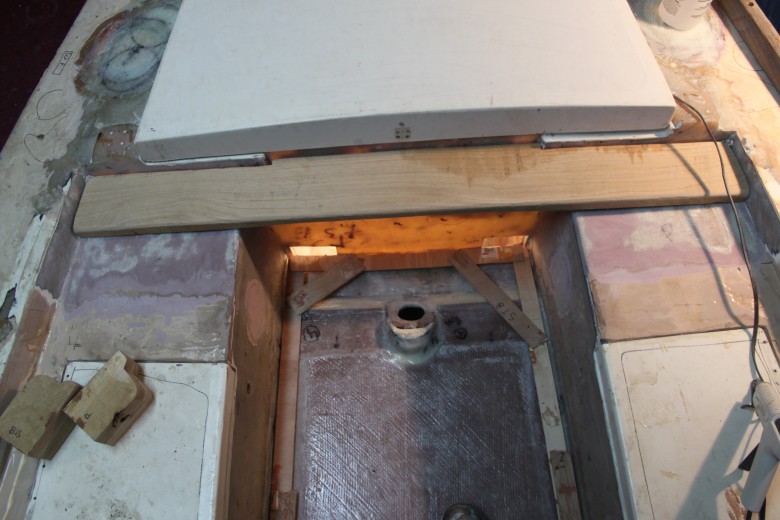
- Cut the Traveler and Mattress Blocks – I used a single piece of white oak for the traveler itself. I first templated the piece, then cut the traveler and made sure it fit properly. I also took the opportunity to create the mattress blocks which will create a little lip to support the teak cockpit grate when it is raised up to create a full mattress in the cockpit. Here’s an image of the traveler freshly cut and set in place:
- Install Fasteners – The traveler was fastened with 4 #10 bolts on both the port and starboard sides (8 total). Before I tightened down the fasteners, I put some 406/403 thickened epoxy between the cockpit seat and the traveler. Then, as the fasteners were tightened down, the epoxy squeezed out a bit and insured a very strong bond.
- Thicken Mattress Blocks – Once the traveler was fastened/thickened in place, I thickened the mattress blocks in place as well so that they would stay in place when workign the area with fiberglass and epoxy.
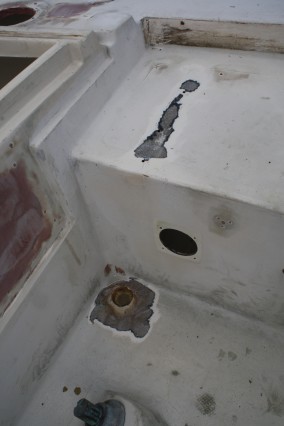
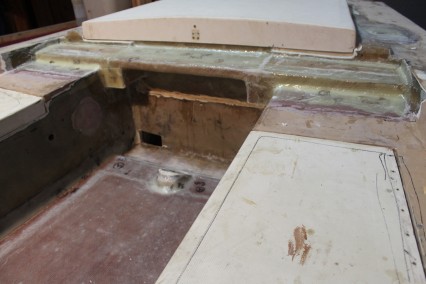
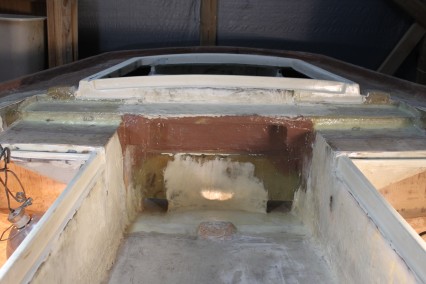
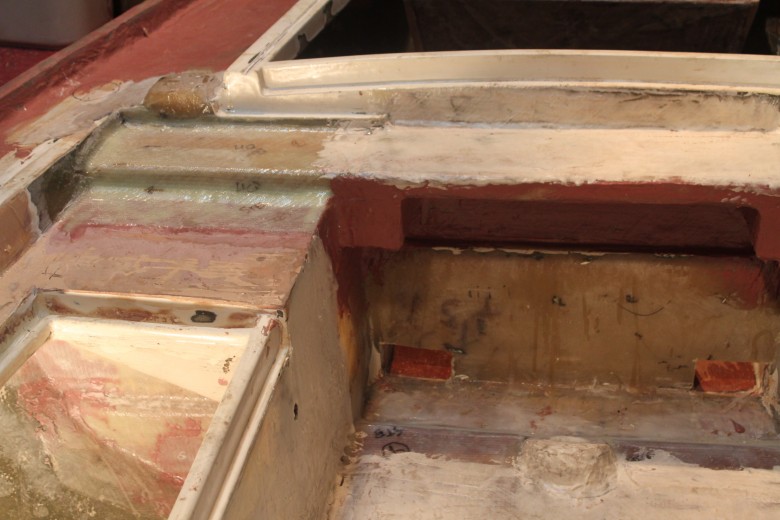
- Glass and Fair – With the traveler and mattress blocks in place, I cut the fiberglass necessary for the installation and went to work with epoxy and fiberglass. While the fiberglass was still tacky, I took the opportunity to put down my first layer of fairing. Here’s an image of how things came together:
Research
- If halyards and reeflines and furling gear lines are led aft to the cockpit, one will increase one’s comfort as well as one’s chances of staying aboard. This could cut down on the number of winches needed, for with the use of stops and as many as three lines could be managed with one winch. The one thing I do dislike about this system is that it usually means lines strung out over the cabin top which makes tying in reefs, and dowsing the main somewhat more treacherous, but then that’s the trade-off. (From a Bare Hull, p. 36)
- The design of the whole rigging – both running and standing – is of great importance to the comfort of a boat’s crew. If the standing rigging is well designed for example, if inboard shrouds are done so as to leave a decent passage either out or inboard of them, if the backstay is so located (either well back of split or yoked to allow the helmsman to stand comfortably beneath it), and if the running rigging is kept out of the way of the crew’s movement but winched well and safely around the cockpit, and if proper stowage is provided for the reams of line that end up heaped on the cockpit sole, then one can feel much safer and much more comfortable aboard.
- …it is possible to arrange the lines so that all sail-handling functions (short of putting on sail ties and a sail cover) can be accomplished from the security of the cockpit…The drawbacks are the added friction generated by running the lines through the necessary blocks and the mass of lines that end up in the cockpit, with the substantial number of rope clutches needed to keep the lines under control. (Cruising Handbook, p. 68)
- Running rigging is the term for the rigging of a sailing vessel that is used for raising, lowering and controlling the sails – as opposed to the standing rigging, which supports the mast and other spars. (http://en.wikipedia.org/wiki/Running_rigging)
- Running rigging consists of all the fiber and wire ropes used to raise, lower and trim sails. Breaking a halyard is not usually a catastrophe, though if it happens when hove-to with storm sails, quick action is required to regain control of the boat. Because the breaking strength of running rigging is seldom tested under straight loads, most problems are caused by chafe – unfair leads, rough-edged sheaves and rubbing against standard rigging. (Upgrading the Cruising Sailboat, p. 206)
- Running Rigging….lines which control and adjust the sails: (http://www.sailingusa.info/parts_of_the_boat.htm)
- Halyard – A line used to raise a sail.
- Sheet – The chief line which is used to adjust a sail against the force of the wind. The mainsail has one sheet. The jib has two, a working (leeward) sheet and a lazy (windward) sheet.
- Boom Vang – A line which places downward tension on the boom.
- Outhaul – Places backward tension on the clew of the mainsail. When tightened it will flatten the lower one-third of the mainsail.
- Reefing Line – A line used to shorten the sail.
Boom Vang
- …using a line to hold the boom out and down when sailing downwind; prevents and vangs (also called kickers) have been with us for a long time…a boom vang led permanently to the aft face of the mast that does not require adjustment when the main sheet is trimmed or eased. Called the “centerline vang” because it is led permanently to the boat’s centerline, this vang can be a tackle or a rigid rod adjusted by either tackle or a hydraulic pump. Of the two, the tackle is preferred because it has some built in elasticity and is less complicated. The centerline vang has several special features. First, it imposes large bending and compressive loads on the boom, so the gooseneck must be very strong; Second, it does not hold the boom outboard, so a preventer should be rigged when running and reaching. A good preventer is made of relatively light, stretchy nylon line led from the foredeck to the end of the boom so that if and when the boat rolls the boom heavily in the water, the boom can come inboard; this relieves some of the load on it. One valuable safety feature is to make sure that the crew can let off the vang and preventer from near the center of the cockpit. Another is to make sure that the vang has some built-in shock absorber to minimize the effects of the load that occurs when the boat is jibed in heavy winds…if there is no give in the vang something may break – it could be the vang, the headboard, or even the boom. A block-and-tackle vang has some automatic give because it contains rope… (Desirable and Undesirable Characteristics of Offshore Yachts, p. 184)
- If you don’t have a totally reliable double-acting vang to keep the boom up, you must carry a wire topping lift on the main boom of any boat…The only seamanlike arrangement is to secure one end to the masthead (using a toggle or a shackle to allow free movement) and attach the other end to the end of the boom with a short tackle. In the main part, use plastic-coated 7×19 wire rope, in the tackle, use nylon line so there is some shock absorber when the sheet is trimmed and the tackle is not eased out (and that will occur frequently)… (Desirable and Undesirable Characteristics of Offshore Yachts, p. 184)
- See image of a boom vang in Desirable and Undesirable Characteristics of Offshore Yachts, p. 185
- The purposes of boom vangs and preventers are two-fold: a) to flatten the sail and remove twist b) to prevent jibing. Unless boom vangs are led to the boat’s rail, they won’t prevent a jibe when the mainsail is set aback. Attaching the boom vang at the base of the mast is most useful when sailing to windward, but it also interferes with stowing a dingy on deck. (Upgrading the Cruising Sailboat, p. 212)
- A rigid vang is well worth having – it eliminates the need for both a topping lift and a boom gallows. (Cruising Handbook, p. 74)
Chafe
- See the ‘Rope‘ project page.
Hardware – Blocks, Cleats, Fairleads & Hanks
- …used in abundance on any boat, to gain purchase power and to fairly direct the lead of the line. Just a few of their applications are jib sheets, mainsheets, travelers, halyards, boom vangs and handy billies. The size of the block should be sufficiently large to withstand the loads exerted on it by line under load. An old rule of thumb is that for every ⅛” line of diameter, the block should be increaed 1”, however, adhering to this formula results in overkill. (Upgrading the Cruising Sailboat, p. 207)
- A sheave (pronounced “shiv” or “shēv”) is a wheel or roller with a groove along its edge for holding a belt, rope or cable. When hung between two supports and equipped with a belt, rope or cable, one or more sheaves make up a pulley. The words sheave and pulley are sometimes used interchangeably. (http://en.wikipedia.org/wiki/Sheave)
- The diameter of the sheave over which hemp or wire rope passes should not be too small, for otherwise the rope will make too sharp a turn and be fatigued…the best sheaves are made of bronze or aluminum, with smooth bushings to help them rotate…sheaves for wire rope must be scored with a groove that provides a close fit. (Desirable and Undesirable Characteristics of Offshore Yachts, p. 186 – 7)
- (See image from Desirable and Undesirable Characteristics of Offshore Yachts, p. 177)
- ….blocks for running rigging should have plastic or stainless steel cheek (side) plates rather than commonly used anodized aluminum; sooner or later, the aluminum corrodes. Rather than being riveted together, larger blocks should be designed to be disassembled for cleaning. (Cruising Handbook, p. 74)
- Lock Off – A jammer called a lock off (or sheet stopper)…consists of a fairlead with a slightly rough surface on one side, and, on the other side, a cam that the sailor engages with a shrot lever in order to squeeze the line and hold it; to let the line go, just disengage the lever. Using a lock-off forward of a winch frees the winch that has just been holding the line for other uses. This means that one winch can serve several needs. The beneficial side effect is that the boat can carry fewer winches….Compared with other securing devices, the lock-off has several other distinct advantages as well. Unlike the traditional horn cleat, the lock-off allows the line to be secured under strain; unlike the traditional horn cleat, the lock-off allows the line to be released when under heavy strain without having to first trim it in an inch or two farther; and unlike the Clam Cleat it works only when you want it to, so it does not accidentally grab the line. On the other hand, a good lock -off usually is more expensive than one of those other cleats, and may take up more room as well…Perhaps the best use for a lock-off is for securing leech reefing lines. In the past, these might have been led to small winches on the boom, which was awkward and slow to use. An improvement is to lead the line through a lock-off in the boom just aft of the gooseneck, around a sheave, and down to a powerful halyard or sheet winch on the mast or deck. After the line has been taken down, the lock-off is engaged and the winch is free for other duties. Another good use for a lock-off…is on the spinnaker halyard to keep it from getting away while being hauled up. Once the sail is fully hoisted and secured, the lock-off should be disengaged…Lock offs are often used on foot blocks to jam a genoa sheet temporarily while the winch is used to take a strain on another sheet. Unfortunately, this does not work well at high loads, and the sheet often slips because the sheave rotates. For a lock-off to be really effective, it must work against a fixed surface that is specifically shaped to generate friction without damaging the rope. (Desirable and Undesirable Characteristics of Offshore Yachts, p. 187 – 189)
- Foot Blocks – heavy sheaves that turn the sheet 190 degrees back to the winch – should be used on jib sheets. Not only do they guarantee that the sheet reaches the right angle, but by being in line with the main force of the sheet they facilitate moving the jib lead forward or aft. Foot blocks also reduce loads on the location ins on the jib-sheet cars on deck tracks. (Desirable and Undesirable Characteristics of Offshore Yachts, p. 187)
Hardware – Winches
- Many yachts are being outfitted with aluminum winches…that is not a good idea: the combination of aluminum drums, stainless steel and bronze internal mechanism, and for ocean sailors, salt water, will create maintenance problems that may shorten the winch’s life….One expensive option with many winches is a self-tailing capability. This can be extremely helpful to a shorthanded cruising boat…because it allows a single sailor to crank in a sheet or halyard with both arms, with nobody else needed to take in the slack. The self-tailer acts as a cleat, but since the loaded line can be unwrapped by water running along the deck, a regular cleat should be furnished for each self-tailor and always used for security….A sheet, or halyard, or other line should approach the winch drum in a plane that is at least 10 degrees below the perpendicular from the bottom of the working part of the drum. This arrangement will help prevent overrides and bad turns. (Desirable and Undesirable Characteristics of Offshore Yachts, p. 189 – 190)
- These hefty little items are among the most expensive gear on your boat. The difference between good winches and poor or undersized ones is their quickness in trimming headsails and mainsails or hoisting men aloft, or breaking anchors out of Mother Earth. They do require some maintenance each year, principally taking off the top part and greasing the gears. Waterpump or Teflon grease works well. In recent years, self tailing winches have become standard fare on many boats. Their labor saving convenience cannot be denied, especially for the short-handed rew. However, they are quite expensive. One can do without them, but if you have the bucks, buy them. As a general rule, you can reduce winch size by 20% when converting to self-tailers. (Upgrading the Cruising Sailboat, p. 163)
- (See figure 9-20 from Upgrading the Cruising Sailboat, p. 163)
- (See figure 9-23 from Upgrading the Cruising Sailboat, p. 164 for images of a single halyard winch)
- The whole logic for leading halyards aft seems a bit suspect anyway. So what if you can raise and lower sails from the cockpit? You still have to go forward to unfurl the main when it’s going up and to gather it in when it comes down. Being able to drop sails from the cockpit may give you a few extra seconds of security, but in a blow (which is the only time this security is really necessary), a headsail loose on the foredeck won’t stay there for long. Of course, nets on the lifelines and lazy jacks on the main do assist in keeping these sails under control, but again, it is only a delaying tactic. (Upgrading the Cruising Sailboat, p. 165)
Line
- See the ‘Rope‘ project page.
Reefing
- Light braided nylon messengers should be rigged through the leech cringles so that at least two relatively deep reefs can be tied in without having to lower the mainsail to lead the reefing lines. (Desirable and Undesirable Characteristics of Offshore Yachts, p. 185 – 6)
- Reefing lines take a heavy strain in rough weather, and chafing is a constant threat. An important aid in performing preventative maintenance is a large opening at each end of the boom to allow you to see what is going inside and to facilitate reeving reefing lines using a “snake”. This is a length of 1×19 stainless steel wire that is about 1’ longer than the boom, with a tight serving on each end and a small, neat eye on one end. (Desirable and Undesirable Characteristics of Offshore Yachts, p. 185 – 6)
- A cruising mainsail should have two reefs, with each reef equal to about 25 percent of the sail’s total area. With the second reef tied in, the mainsail area is halved. The next step wold be to set the storm trysail, whose area should be about one-half that of the double-reefed mainsail, or about 25% that of the entire mainsail…cut the mainsail’s luff curve fairly straight so that extreme mast bend is not needed to obtain an efficient shape. The roach should be moderate, less than on a racing mainsail, in order to reduce loading on the battens. (Desirable and Undesirable Characteristics of Offshore Yachts, p. 198)
- Perhaps no other alteration to your sails as important as the sewing of reef points. Whether you use roller reefing or slab (jiffy) reefing it is important to achieve a flat set on the main. The ability to reef down in a blow is vital. Heel is reduced, speed is seldom lost (and actually may be increased if the boat excels at lower angles of heel), and the crew will certainly feel safer. (Upgrading the Cruising Sailboat)
- [Slab Reefing] utilizes either a traditional sail with short battens or a fully battened main. I like the economy, simplicity and reliability of this approach. (Cruising Handbook, p. 67)
- Reefing can be done from the cockpit or by going forward to the mast. It is especially easy if the boat has rigid vang so that there is no need to set up and take of a topping lift when reefing. Slab reefing from the cockpit often utilizes a single reefing line that is run through a reef cringle (a ring sewn or pressed into the sail) on the leech (aft edge) of the sail and is then led forward to another cringle in the luff, and then back to the cockpit. To reef, the mainsheet and vang are eased and the topping lift set up (if needed to support the boom), the halyard is ease, and the reefing line is cranked in, pulling down both the leech and the luff of the sail. The halyard is re-tensioned, the topping lift let off (if set) and the vang tensioned…Most often, tying in a reef is actually faster with a single line system. When the reef is no longer needed, it is easier to shake out. (Cruising Handbook, p. 67)
- Personally, I prefer to keep the necessary lines out of the cockpit altogether, carrying out the entire operation from the base of the mast – which, although frequently wet, is a reasonably secure location. This requires the halyard winch to be at the mast and the halyard to be stowed there. The reefing lines are run through line jammers on the base of the boom to a winch low down on the mast. They are stowed on the boom. (Cruising Handbook, p. 67)
- Reefing from the mast enables a reefing hook (horn) on the boom to be used in place of the luff downhaul. This gets rid of one line and a chafe point. When I’m all done, I’m in the right place to inspect the reef and the set of the sail, and to put in an added chafe-prevention line through the leech cringle if the reef is likely to be left in for any length of time….it is often difficult to get the cringle over the hook and to keep it there while re-tensioning the halyard. Furthermore, if it’s done incorrectly, there is a risk of tearing the sail. A much better approach is to place a length of heavy webbing through the cringle, and to sew a couple of rings to each end of it so that one hangs down on either side of the sail. it is then simplicity itself to pull one of these floppy rings over the hook (as long as it is possible to get the ring over the hook without having to remove any of the bottom sail slides from the mast track; it’s hard to believe, but there are some boats on which it is necessary to remove the lower sail slides in order to reef). (Cruising Handbook, p. 69)
- If more than one reef is needed at any time, all should be tied in properly, rather than simply going straight to the second or third. This way, there is less likelihood of lines tangling, and the reefs can be shaken out one at a time when the wind eases. (Cruising Handbook, p. 71)
- …the cringle may be difficult to reach over a biminini or dodger, or out over the water if the boom is at all eased… (Cruising Handbook, p. 71)
- Traditionally, after a main is reefed, a series of reef points have been tied in to gather up the reefed portion of the sail (the bunt) and prevent it from fapping around. This is now considered to be bad practice. If the leech line chafes through, a tremendous load – for which it is not designed – is transferred to the reef point ahead of the leech cringle, very often tearing the sail. The next reefing point then takes up the load and tears, and so on. We never tie in the reefing points and have never found the loose bunt of sail to be a problem. (Cruising Handbook, p. 72)
- Many cruising mains have three sets of reef points, which result in a number of reefing lines and the potential for considerable confusion. Furthermore, the third reef is only used in extreme conditions. With the reef in place, the leech of the sail will now be well forward on the boom, while the mainsheet will frequently exert its usual pressure well aft on the boom, which can result in a bent boom. If the conditions that require a third reef are anticipated, it is preferable to add a separate sail track to the mast and to have a trysail onboard. The track should come down close to the deck so that the sail can come down close to the deck so that the sail can be bent on (attached to its track) in anticipation of rough conditions and then kept tidily stowed in its bag. The track should be as long as is needed rather than feeding into a gate on the mainsail track, which is likely to lead to snafus at the most inopportune times. (Cruising Handbook, p. 72)
- Regardless of how slab reefing is set up, what makes no sense at all for sailing short-handed is to have the halyard on the mast and the reefing lines in the cockpit, or else the halyard and leech reefing lines lead to the cockpit but with a reefing hook on the boom…If it is necessary to go forward to release the halyard or to get the luff of the sail over the reefing hook, what’s the point of running the other lines aft? Specifially, having hte lines aft but still using a reefing hook is simply absurd. Whoever is reefing the sail has to release the halyard, go forwad to get the luff onto the hook, and then return the cockpit to crank up the halyard and the leech line – by this time, the luff has probably come off the hook! In practice, two people are needed to reef: one to hold the luff on the hook and the other to work the lines.
- …the reefing line needs to be fed onto the [roller furlor] drum at right angles through a fairlead. If this is not done, the line is likely to pile up at either the top of the bottom of the drum and then jam. To avoid loose wraps and snarls, tension is required when rolling in and pulling out the line. At times, specifically when the sail is partially reefed in heavy weather, this line is under some serious loads. The blocks used to lead it aft, as well as their mounting bases, must be up to the task. (Cruising Handbook, p. 65)
Roller Furling
- Since these systems can malfunction, the most seamanlike arrangement is to have a forestay on which you can hank a staysail as a backup, should the furler fail. (Desirable and Undesirable Characteristics of Offshore Yachts, p. 202)
- One problem area for the typical roller-furling system appears with a short-luffed jib. Usually, a pendant must be rigged between the furler’s top swivel and the sail’s head in order to position the swivel near the halyard sheave. This pendant creates an angle between the swivel and the jib halyard sheave, which prevents the swivel from turning with the stay and causing he halyard to wrap around the stay. Eventually, either the halyard breaks or the stay is wisted and kinked. The solution is to raise the jib foot pendant so that the swivel and the head alike are positioned near the halyard sheave. (Desirable and Undesirable Characteristics of Offshore Yachts, p. 202)
- Another common difficulty is that crew embers sometimes leave unused jib or spinnaker halyards near the stay, and the halyards are wrapped up when the sail if furled or unfurled. Eventually, the stay will twist. Obviously, then, all unused halyards must be kept at the mast. (Desirable and Undesirable Characteristics of Offshore Yachts, p. 202)
- Forestays with roller reefing sails flex the most, especially when motoring into head seas with the sails furled. At these times, toggles at the head of the stay are as important as at the foot. (Cruising Handbook, p. 62)
- A roller-reefing jib or genoa is almost a foregone conclusion on a modern cruising boat. Roller reefers have been refined to the point that – assuming proper installation – they are not only reliable, but also reasonably long lived. Nevertheless, they add weight aloft, they make it just about impossible to flatten a reefed sail for windward work in heavier airs, they make sail changes – if they become necessary – much more difficult than with a hanked on sail… (Cruising Handbook, p. 64)
- The critical installation points for minimizing the likelihood of problems are as follows: (Cruising Handbook, p. 64)
- Ensuring adequate toggling of the head stay
- Ensuring that the halyard cannot wrap around the headstay when reefing
- Providing a fairlead for the reefing line onto the reefing drum
- Maintaining a little tension on the line and sail when unfurling and reefing the sail, so that the sail and reefing line both roll up tightly.
- Halyard wrap is a common problem. It can lead to foil damage, the halyard chafing through or…a failure of the stay. To avoid it, the halyard needs to angle away from the stay at least 10 degrees when the sail is fully hoisted. When this is not possible, the addition of a proprietary halyard stop (supplied with some roller reefers) provides a measure of insurance. If sails of different size will be used on the same roller reefer, the smaller sails should be fitted with pendants – lengths of line or cable at the top and/or bottom of the luff (that allow the upper swivel of the roller reefer to hoist to approximately the same position as with the large sails. This maintains a consistent angle between the halyard and the stay. (Cruising Handbook, p. 64)
- …for offshore work, a roller reefer should be oversized compare to one intended for day sailing. It is best to buy a proven brand such as Furlex, Harken, profurl, Reckmann or Schaefer. (Cruising Handbook, p. 65)
- …the current generation of jib furlers deliver exactly what they promise – easy headsail handling without the need to go forward, plus sail shape even better than hank-on because the luff is fully attached. And they are as dependable as a diesel engine. (This Old Boat, p. 128)
- As for the angle the halyard makes with the stay, if it is less than about 7 – 8 degrees, you run the risk of the dreaded halyard wrap – the halyard winding around the foil when you furl the sail. This will – at a minimum – jam the furlor and may damage the foil, the halyard, and even the stay. On an old boat you should anticipate the need to install a halyard restrainer near the top of the mast to force the correct halyard geometry. The halyard swivel should be within 3 – 4” of the top of the foil with every sail you hoist on the furler,which requires similar hoist lengths. you achieve this by adding a wire pendant to the top or bottom (or both) of any sail that is too short. (This Old Boat, p. 129)
Sail Containment
- Lazy Jacks I – One of the best ways to control sails being lowered is by way of lazy jacks. these lines are led from the boom to a point on the mast; they run on both sides of the sail so when it is lowered it naturally flakes on top of the boom and doesn’t tumble down over the deck. As you may want to control their tension, they should be led to a single line – perhaps to the topping lift – that runs through a block on the mast and down to a cleat. The other lines can be run under the boom or terminated to strap eyes screwed into the boom. The number of lines depends on the sail. (Upgrading the Cruising Sailboat, p. 213)
- Lazy Jacks II – …many people still use the traditional, inexpensive, and very seamanlike system of lazyjacks. These are light lines running from aloft on the mast to two or three spots on the boom. When the sail is dropped it is automatically contained in the bights of the lines and so kept off the deck and out of the crew’s way until they have time to do a proper furl. (Desirable and Undesirable Characteristics of Offshore Yachts)
- Lazy Jacks III – Lazyjack keep the loose sail from falling off the boom onto the deck. The sail then has to be tidied up and strapped to the boom with a series of sail ties before putting on a cover. Depending on the height of the boom off the deck and boom’s accesibility, this may be easy or something of a chore.
Sheets
- The closer to the mast the mainsheet is attached to the boom, the more power is required to trim the main. Mainsheets can be attached to the deck anywhere from a traveler over the main companionway hatch to the bridge deck, to a traveler mounted on a beam across the cockpit, to a traveler thru-bolted to the afterdeck and attached to a boom bail or swiveling tang at the end of the boom. The more power required to trim the mainsail, the more blocks are required to provide the necessary purchase power, and the greater the likelihood of needing a winch for assistance. (Upgrading the Cruising Sailboat, p. 208)
- An intriguing variation of this arrangement is to rig two independent mainsheet tackles, one to port and one to starboard….Not only does this system obviate the clutter of a vang at the mast base, which often interferes with dinghy stowage, it also eliminates uncontrolled jibes. (Upgrading the Cruising Sailboat, p. 210)
- See image 10-26 of twin mainsheet arrangement from Upgrading the Cruising Sailboat, p. 210
- …the most seamanlike jib system for cruising is the traditional bronze sailhank hooked over a rod or 1×19 wire headstay. Bronze is the best material for a hank because, being relatively soft, it will not damage the stay on which it is used. When dousing the sail with this system, just let go of the halyard and sheet The sail should drop at least halfway on its own. The clew may drag in the water, but because the sail is attached all up and down the luff, as long as the sheets are well eased it will not catch water like a sea anchor. (Desirable and Undesirable Characteristics of Offshore Yachts, p. 197)
- Snap shackles should not be used to attach the sheets to the clew. When the boat is headed up or in irons, the flapping of the sail makes the shackle a dancing murder weapon. Better to tie bowlines in the sheets; they won’t let go, won’t hurt your noggin and are easily untied. If each sail has its own set of sheets permanently tied on the business of changing sails is simplified, especially when stitching to very light or heavy sails with correspondingly different diameter sheets. (Upgrading the Cruising Sailboat, p. 210)
- Locating Mainsheet – ….problem with moving….mainsheet traveler forward is that it puts the sheet attachment point somewhere in the middle of the boom, while most of the upward load is concentrated toward the end of the boom (where the leech of the sail is attached). This can result in a bent boom. The way to spread the loads is with four- or six-part tackle, with two or three attachment points spread out along the boom. It results in a very long main sheet, but there’s not much that can be done about that. (Cruising Handbook, p. 81 – 2)
- Traveler Usage I – The traveler is used to change the angle of attack of the sail. Like the wings of an airplane the angle of attack dictates the amount of lift generated by the wind flowing over the airfoil shaped wing. The angle at which the sail is set against the apparent wind determines the amount of energy the sail will generate. By decreasing the angle of attack the sail is de-powered and becomes less efficient, or in other words the sailboat will go slower. A sailboat without a traveler has a constant angle of attack which can only be adjusted by the mainsheet. Using the mainsheet to adjust the angle of attack will also change the twist and draft of the sail or in other words the airfoil shape of the sail. The distortion is because the mainsheet will pull down on the boom or let the boom raise if you let out the mainsheet, changing the airfoil shape of the sail. The traveler adjusts the angle of attack without changing the airfoil shape of the sail, it only changes the angle in which the wind is blowing over the sail. You can also change the amount of energy the sail will generate by changing the airfoil shape of the sail. The sails of a sailboat are like the wings on an airplane. Changing the aerodynamic airfoil shape of the sail by flattening the sail and making it less like the curved shape of an airplane’s wing will reduce the amount of lift or forward motion generated by the wind over the sail. Sailing is using the wind to generate forward motion by adjusting the shape of the sails, the angle of attack the wind is blowing over the sails and the direct the sailboat is heading in. (http://forums.sbo.sailboatowners.com/archive/index.php/t-50253.html)
- Traveler Usage II – Travelers give better control of the mainsail’s shape and are standard fare on racers. The cruiser can obtain satisfactory sail shape through using vangs and preventers, and so can dispense with the mainsheet traveler. (Upgrading the Cruising Sailboat, p. 208)
Links
Boom Vang
- Great video on the topic of boom vangs – http://www.youtube.com/watch?v=C31nGzO54O4
Hardware
- Technical Information on Block Systems – http://l-36.com/block_sys.php
- Garhaur Marine Catalog – http://garhauermarine.com/catalog.cfm
- Peterson 34 Equippment (Hardware and more) – http://sailing.thorpeallen.net/Greyhawk/Greyhawk.html#Equipment
- Used Winches – http://baconsails.biz/usedwinches.html
- Great Article on Bedding Deck Hardware with Butyl Tape (Maine Sail) – http://www.ericsonyachts.org/infoexchange/showthread.php?t=8645
Comment Form